Blokees® Community


How to Assemble Blokees Marvel Rivals Spider-Man
No tools. No paint. No glue. The Marvel Rivals Champion Class Spider-Man is a tool-free snap-fit kit. Full character background at the Spider-Man Wikipedia page.
The full lineup is at the Marvel Toys page. Here is the assembly sequence in brief:
-
1. Check all parts against the instruction booklet before starting.
-
2. Assemble the torso first.
-
3. Attach arms and legs.
-
4. Attach the head.
-
5. Choose hand set for the pose.
-
6. Add web gauntlets and web-shooting effect last.
-
7. Test joints gently before placing on the shelf.
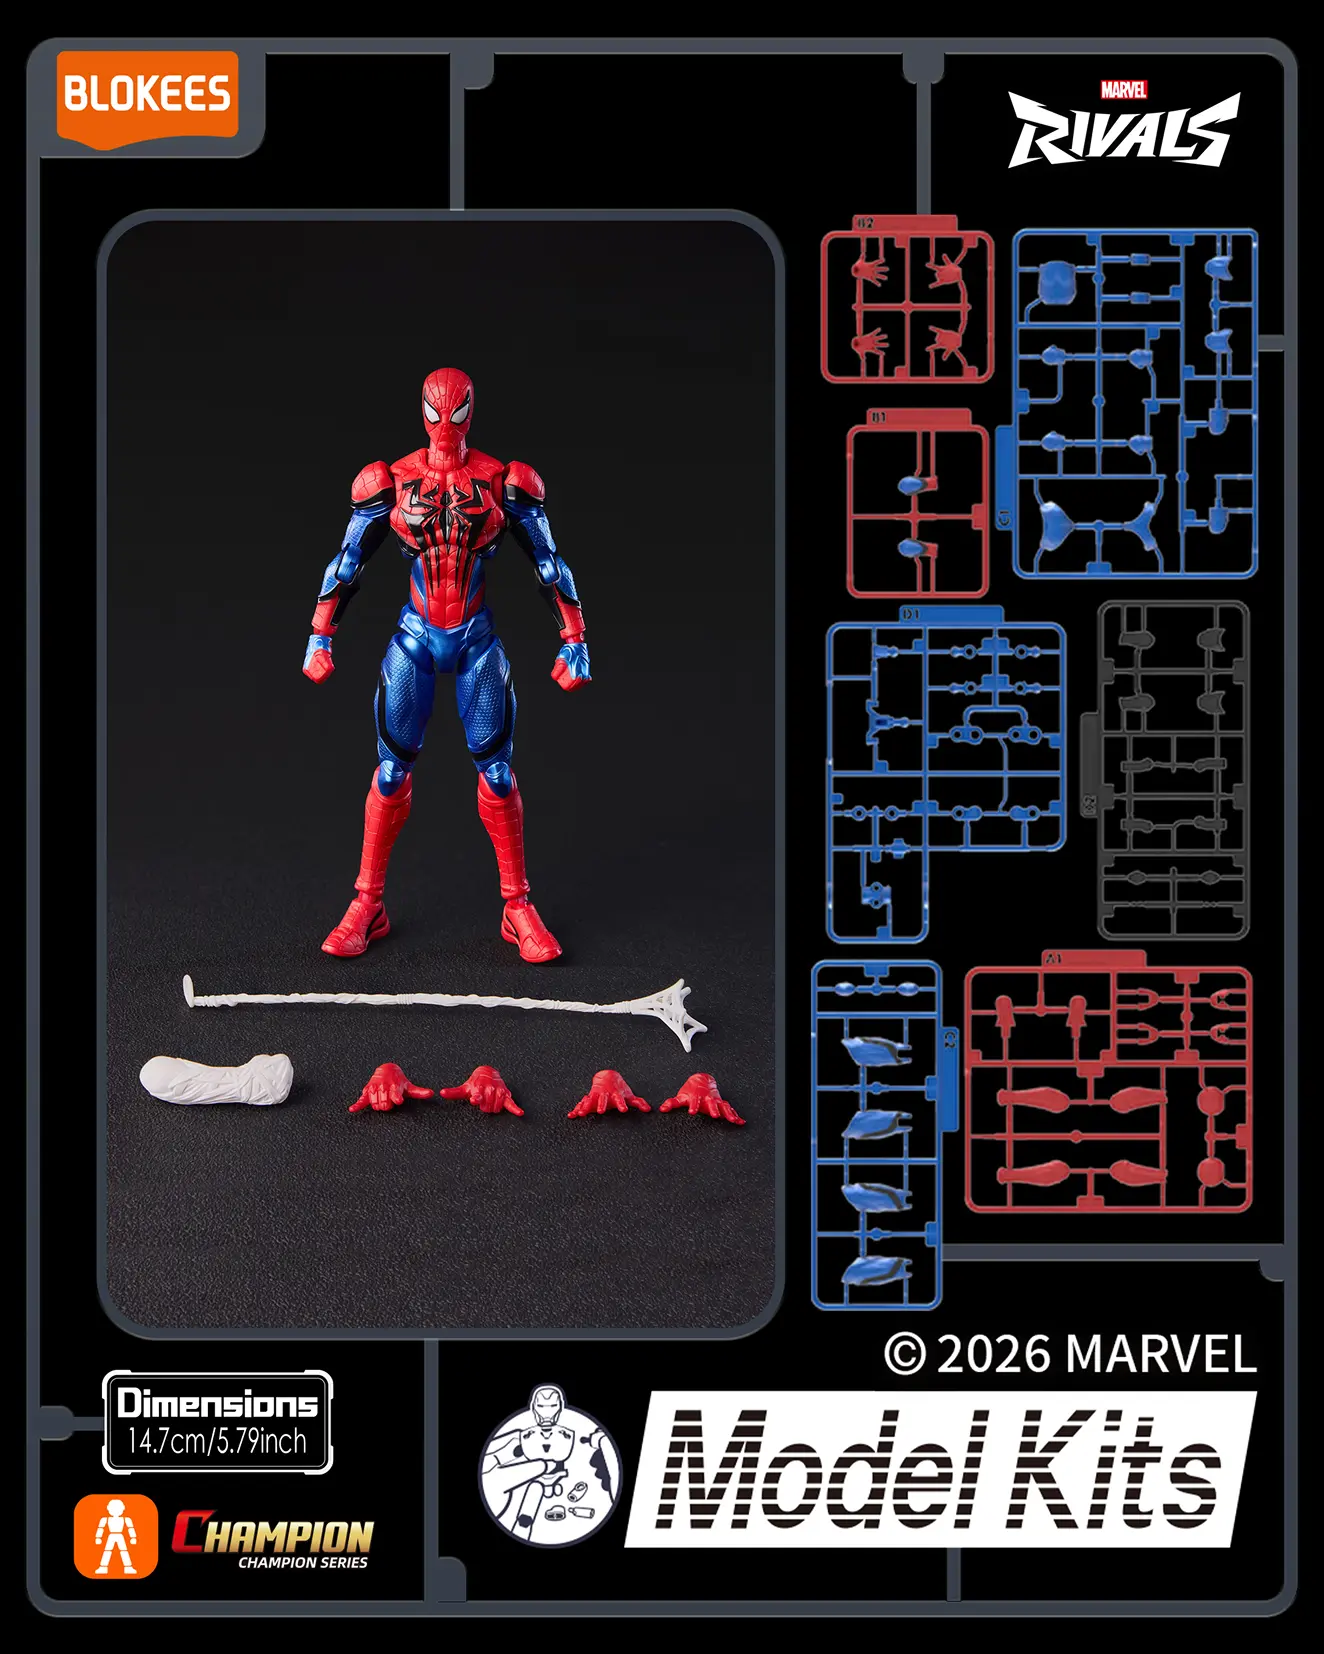
What Comes in the Marvel Rivals Spider-Man Kit

Verify every item against the instruction booklet before starting. The Spider-Man kit product page has the complete package listing.
|
Item
|
What it does
|
When to use it
|
|
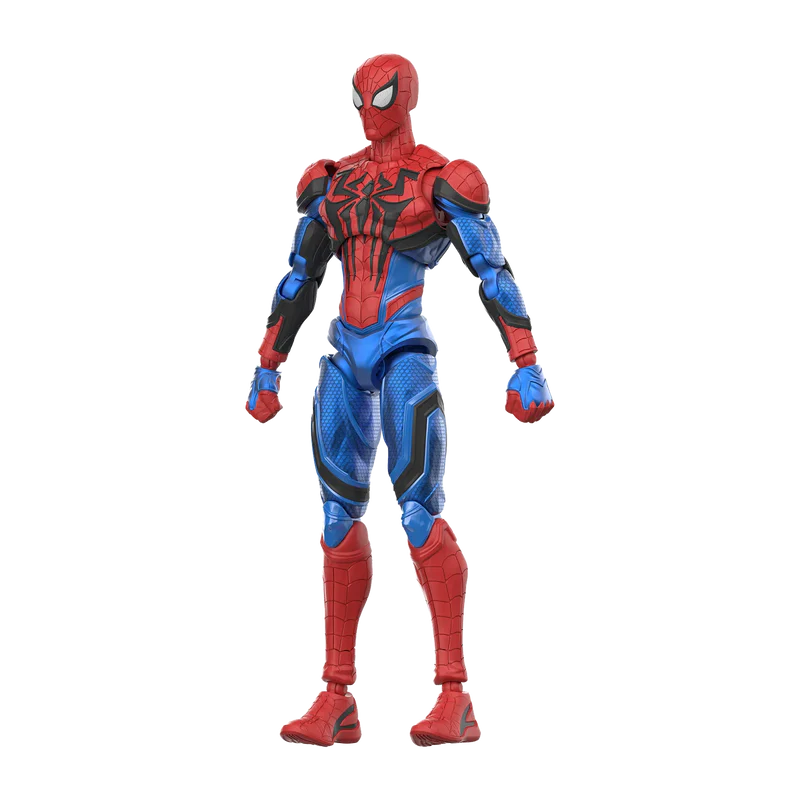
Spider-Man kit
|
The main pre-painted character body. 83 pieces total. 5.79-inch scale when fully assembled.
|
First
|
|
Web gauntlets
|
Attach to the wrists after arms and hands are secured. The signature Spider-Man display accessory.
|
After hands
|
|
Web-shooting effect
|
Slots onto the gauntlet or hand for a mid-web-swing display. Best for motion-style photography.
|
Last
|
|
Interchangeable hands ×3 sets
|
Three distinct hand sets: relaxed open, web-pose spread, and gripping. Choose the right set before the web gauntlets go on.
|
Before gauntlets
|
|
Instruction booklet
|
The primary assembly reference. Part numbers, diagrams, and the correct order. Read it before pressing any joint.
|
Throughout
|
Key specifications
-
Total pieces: 83
-
Articulation: 42 points
-
Scale: 5.79 inches when assembled
-
Finish: Pre-painted — no painting required
-
Assembly: Tool-free snap-fit
-
Age: 14+
Before You Start: Set Up Your Assembly Space

A good workspace makes the difference between a smooth assembly and a lost part. Five minutes of setup prevents thirty minutes of searching for a small hand piece.
|
What to do
|
Why it matters
|
|
Use a clean, flat surface
|
Small parts — especially the three hand sets — roll off sloped surfaces. A tray or mat stops them.
|
|
Sort left/right parts separately
|
Arms and legs are directional. Pre-sorting prevents force-fitting a part that doesn’t belong.
|
|
Keep hand sets and web accessories separate
|
The three hand sets look similar. Keep them in distinct groups until you’ve decided the final pose.
|
|
Keep the instruction booklet open
|
The booklet confirms which part number goes where. Don’t trust memory for a 83-piece kit.
|
|
Keep packaging until complete
|
If a part looks wrong or is missing, the packaging confirms part names for any support request.
|
Step-by-Step: How to Assemble Marvel Rivals Spider-Man

Follow the instruction booklet alongside these steps. If a part feels tight, check the diagram first. Do not force joints.
|
Step
|
What to do
|
|
Step 1
|
Check the instruction booklet — Open it first. Match every part in the tray against the part diagram. Any missing or misidentified part is easier to fix now than halfway through.
|
|
Step 2
|
Assemble the torso and waist — Start from the central body section. This is the structural anchor for everything else. Make sure the waist connection feels secure before moving on.
|
|
Step 3
|
Attach the legs — Match left and right leg pieces carefully. The fit is directional. Once attached, move each joint through a small range of motion to confirm it’s seated correctly.
|
|
Step 4
|
Attach the arms — Same principle as the legs. Left and right are not interchangeable. Press gently until the joint clicks. Don’t rotate aggressively before confirming the arm is fully seated.
|
|
Step 5
|
Attach the head — Align the neck joint before pressing down. The head should rotate smoothly once attached. If it resists, recheck the alignment rather than forcing it.
|
|
Step 6
|
Choose the hand set — Three options: relaxed open, web-pose spread, and gripping. Decide the final pose now. Swapping hands after the gauntlets are on is harder than choosing first.
|
|
Step 7
|
Add the web gauntlets — Slide them onto the wrists after the arms and chosen hand set are secured. Check alignment before pressing fully. They should sit flush.
|
|
Step 8
|
Add the web-shooting effect — Attach to the gauntlet or hand last. Position it after you’ve decided the final display angle. For a mid-swing pose, the effect should extend forward from one arm.
|
|
Step 9
|
Test the final pose — Move one joint at a time. Start from the waist. Keep the pose balanced — the feet need to sit flat on the shelf for stability. Once balanced, the 42-point articulation holds the pose.
|
How to Pose Spider-Man After Assembly

42-point articulation means the pose you want is achievable. Here are the four display configurations that work best for this kit.
|
Pose
|
How to achieve it
|
Best for
|
|
Classic standing
|
Relaxed hand set. Arms slightly out from the body. Head forward. Feet flat. No accessories attached.
|
Small desks. Clean minimal display.
|
|
Web-shooting
|
Web-pose hand set. One arm extended forward at 45 degrees. Web-shooting effect attached to the extended arm. Lean torso slightly forward.
|
Motion photography. Display shelf.
|
|
Crouched hero
|
Knees bent using the leg articulation. Arms angled out. Slight forward torso tilt. Both feet stable on the surface.
|
Mid-action display. Works best on a wide surface.
|
|
Display photo pose
|
Web-shooting arm extended. Side lighting from left. Web-shooting effect in full view. Camera angle from below-right for the most dynamic result.
|
Photography. Social media display.
|
Display tip for the web-shooting effect
The web-shooting effect is most visible when it extends toward the camera and the kit leans slightly forward. Side lighting from a single source creates shadow depth on the suit panels.
Common Assembly Mistakes to Avoid
|
Mistake
|
What happens
|
How to avoid it
|
|
Skipping the part check
|
Small parts — hands, web effect — get missed. You discover the gap mid-assembly.
|
Match every item against the instruction booklet before pressing a single joint.
|
|
Forcing a tight joint
|
Snap-fit connection points can crack if pushed before the alignment is correct.
|
If it resists, stop. Check the booklet. Recheck the orientation. Press slowly.
|
|
Adding accessories too early
|
Web gauntlets and the web effect become obstacles when you’re still attaching arms.
|
Assemble the full body first. Accessories are the final step.
|
|
Choosing hands after gauntlets
|
Removing gauntlets to swap hand sets is fiddly and risks the gauntlet connection point.
|
Choose the hand set in Step 6 before the gauntlets go on in Step 7.
|
|
Posing before everything is secure
|
Aggressive posing before connections are fully seated can loosen joints.
|
Complete all steps first. Test the pose gently after full assembly.
|
|
Discarding the instruction booklet early
|
Without the part diagram, you may force a wrong piece into a wrong joint.
|
Keep the booklet until the kit is fully assembled and the display pose is set.
|
Is the Marvel Rivals Spider-Man Kit Good for Beginners?

Yes. The tool-free snap-fit format is designed to be accessible. No specialist skills required.
|
If you...
|
This kit is...
|
|
Want a display-ready kit fast
|
The right choice. Pre-painted finish. Snap-fit joints. No post-assembly work required.
|
|
Have never assembled a kit before
|
Fine. The instruction booklet has clear diagrams. 83 pieces is manageable for any first-time assembler.
|
|
Want dynamic poses
|
Good choice. 42-point articulation means the web-swing and crouched poses are both stable and achievable.
|
|
Want hands-on engagement rather than a static shelf piece
|
Strong choice. The interchangeable hand sets and web-shooting effect create multiple display configurations.
|
|
Are buying this as a gift for ages 14+
|
Appropriate. Ages 14+ per the The tool-free assembly means no extra tools are needed as part of the gift.
|
Searching for “How to Play Spider-Man Marvel Rivals”? Read This First
This article covers the Blokees model kit assembly process. It does not cover in-game Spider-Man tactics or Marvel Rivals gameplay. Full game background at the Marvel Rivals Wikipedia page.
Why Marvel Rivals players still come here
-
Game-accurate design. The kit replicates the Marvel Rivals Spider-Man design. Same suit, same visual — physical version of the in-game character.
-
Desk display of your main. Players who run Spider-Man often want a physical version on their desk next to their setup.
-
The kit captures the movement. The web-shooting effect and 42-point articulation recreate the mid-swing poses that Spider-Man is known for in the game.
For in-game guidance
Gameplay tips, ability breakdowns, and hero stats are at the official Marvel Rivals site. This article covers the physical kit only.
What to Assemble Next

Spider-Man is one of eight kits in the Marvel Champion Class lineup. Here are the three natural companion choices after Spider-Man.
|
Kit
|
Why it pairs with Spider-Man
|
Price
|
|
Marvel Rivals Champion Class Venom
|
Same price tier. Natural rivalry display. Venom’s 5.91-inch scale and tentacle accessories create immediate visual contrast with Spider-Man’s 5.79-inch athletic pose.
|
|
|
Marvel Rivals Champion Class Peni Parker SP//DR
|
Spider-Verse companion. 77-point articulation — the highest in the lineup. Light-up mech. Natural shelf grouping with Spider-Man.
|
$27.99
|
|
Marvel Infinity Saga Champion Class Iron Man MK85
|
Avengers display expansion. LED chest arc reactor and LED eyes at $19.99. Three-kit shelf: Spider-Man, Iron Man, and Peni Parker.
|
$19.99
|
Conclusion
83 pieces. Tool-free snap-fit. 42-point articulation. No tools, no paint, no glue. The assembly process from unbox to display pose takes most people under 30 minutes.
Read the instruction booklet first. Choose your hand set before the gauntlets go on. Add the web-shooting effect last. Test the pose gently.
Browse the full Blokees Marvel catalog after you’re done. Venom and Peni Parker are the natural next assembly choices.
FAQs
What is included in the Marvel Rivals Spider-Man kit?
Spider-Man kit body, web gauntlets, web-shooting effect, three sets of interchangeable hands, and an instruction booklet. Full package contents..
Do I need tools to assemble Marvel Rivals Spider-Man?
No. Tool-free snap-fit assembly. No screwdrivers, no glue, no paint. Press-fit joints connect without any additional tools. Refer to the instruction booklet included in the box.
Does the Spider-Man kit need painting?
No. Pre-painted finish. The kit arrives with all coloring applied. Unbox, assemble, display.
How tall is the Marvel Rivals Spider-Man model kit?
5.79 inches when fully assembled. Verified from the official product page at blokees.com/en-us.
How many parts does the Spider-Man kit include?
83 pieces total. Verified from the official product page.
How do I attach the web-shooting effect?
The web-shooting effect attaches to the web gauntlet or hand after the arm assembly is complete. Attach it last, after you’ve chosen the hand set and gauntlet position.
How many hand sets come with the Spider-Man kit?
Three sets of interchangeable hands. Relaxed open, web-pose spread, and gripping. Choose the set that matches the final display pose before adding the web gauntlets.
Is this guide about the Spider-Man game character or the Blokees kit?
The Blokees kit. This guide covers assembly, posing, and display of the Marvel Rivals Champion Class Spider-Man model kit. For in-game gameplay tips, visit the official Marvel Rivals site.
What does 42 points of articulation mean?
42 independently movable joints across the kit. That covers the torso, waist, shoulders, elbows, wrists, hips, knees, ankles, and head. It enables the mid-web-swing and crouched poses that represent Spider-Man’s movement style.
Sources
- IP collection: Marvel Toys, Blokees Marvel IP collection.
- Series page: Marvel Champion Class, Marvel Rivals Champion Class kits. Character-accurate details, dynamic articulation, no tools required.
- Verified product specs: Marvel Rivals Champion Class Spider-Man. $19.99, 5.79 inches, 83 pieces, 42-point articulation, web gauntlets + web-shooting effect + 3 interchangeable hand sets + instruction booklet, pre-painted, tool-free snap-fit, ages 14+.
- Companion kit: Marvel Rivals Champion Class Venom. $27.99, 5.91 inches, 42-point articulation, Venom tentacles + attack effect hand + replacement backplate.
- Companion kit: Marvel Infinity Saga Champion Class Iron Man MK85. $19.99, LED chest arc reactor + LED eyes.
- Character background: Wikipedia — Spider-Man, April 2026.
- Game background: Wikipedia — Marvel Rivals, April 2026.
- Official game reference: marvelrivals.com, Spider-Man hero page, April 2026.


Looking for something else?

Iron Man’s Armor Evolution: Mark 1 to Mark 85 with Blokees
LEARN MORE
Wolverine vs. Deadpool: Who Would Really Win?
LEARN MORE
The Complete History of the Venom Symbiote: Origins, Hosts, Films & Family Tree Explained
LEARN MORE
The Best Marvel Rivals Merchandise to Buy Right Now
LEARN MORELooking for something else?
Spider-Man vs. Venom: Best Desk Collectibles
LEARN MORE
Top 5 Iron Man Action Figures for Your Hall of Armor
LEARN MORE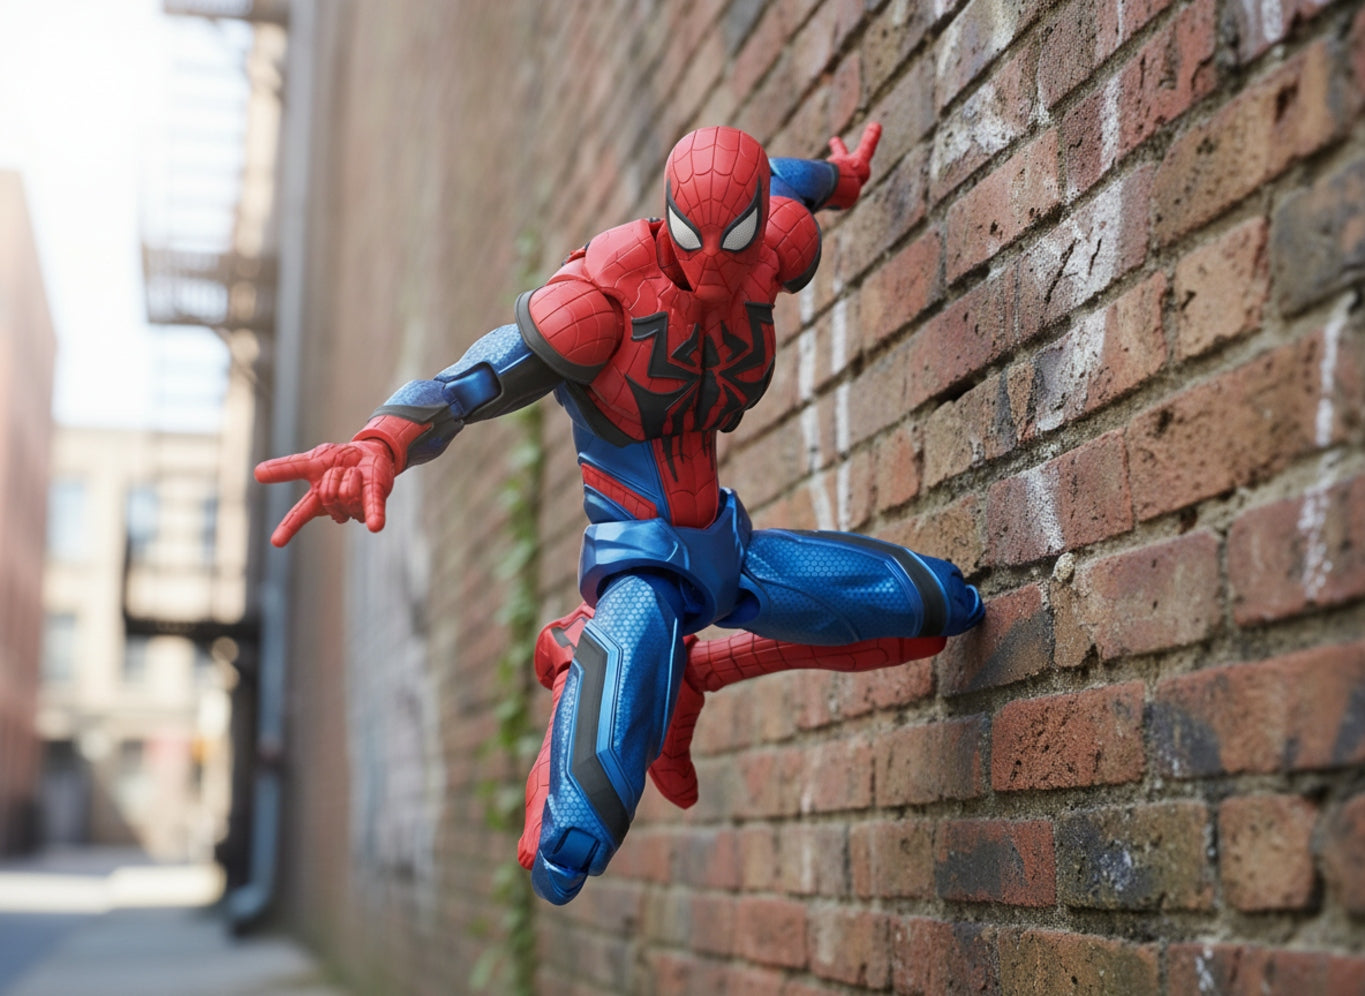
Spider-Man’s Best Alternate Suits Explained
LEARN MOREYou may also like
New


Whole Set
New


Single Box
New


Whole Set
New


Mythical Aspect Sun Wukong
Further reading

Harley Quinn's Complete Origin Story: From Doctor to Chaos Queen
Not many DC characters have traveled as far as Dr. Harleen Frances Quinzel. She started in 1992 as a one-episode sidekick in a cartoon. Three decades later, Harley Quinn is one of the best-known na...

Batman Beyond and Legendary Batman Assemble: A Guide to Two Officially Licensed Blokees DC Model Kits
The Blokees DC lineup includes two officially licensed Batman model kits that suit different collectors: the DC Champion Class 02 Batman Beyond and the DC Defender Version 01 Legendary Batman Assem...

Who Is Batman Beyond? The Dark Knight of the Future Explained
Gotham belongs to the bat. The man under the cowl never did, and Batman Beyond runs straight at that idea. Picture a neon future, decades past the Gotham most fans know, where Bruce Wayne has aged ...