Blokees® Community


How to Assemble the Blokees Naruto Uzumaki Model Kit
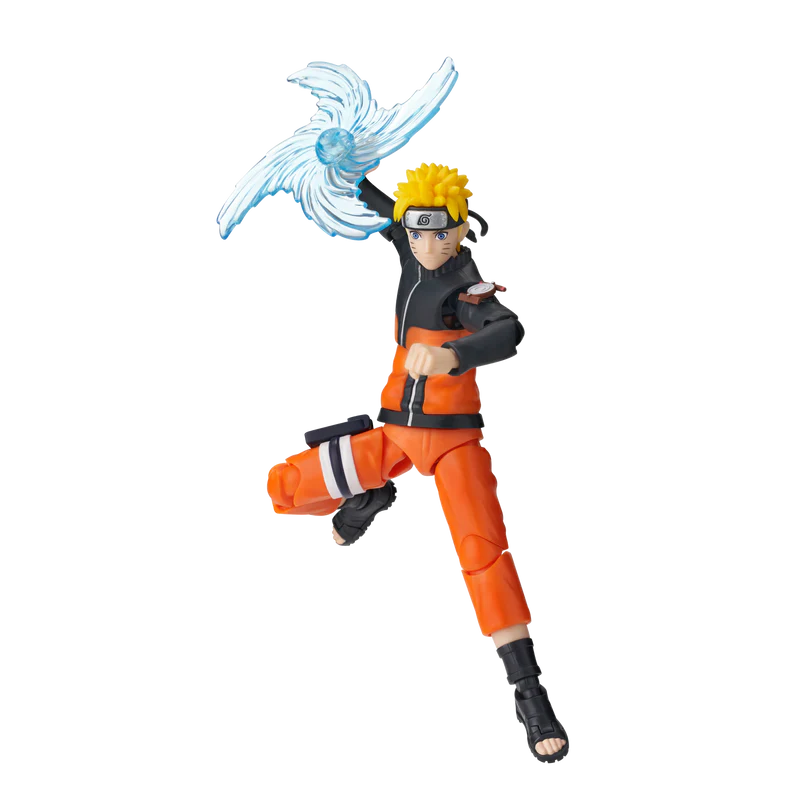
Naruto Uzumaki is one of the most recognized characters in anime history. From his introduction as an orphan outcast to his role as the Seventh Hokage, his story ran from 1999 to 2014 in manga and 2002 to 2017 across two anime series. Character documentation at Naruto Fandom — Naruto Uzumaki.
The Blokees Naruto Champion Class 02 Naruto Uzumaki kit puts him on your desk in Shippuden-era design with 22 articulation points, the Rasenshuriken, Rasengan, Kunai, special effect clouds, interchangeable faces and hands, and a display stand. All snap-fit. No tools required. Full catalog at Naruto Toys.
This guide walks through every assembly step accurately, based on the confirmed snap-fit method from the official product page.
Assembly Overview
|
Specification
|
Verified data
|
|
Kit name
|
|
|
Series
|
Naruto Champion Class
|
|
Assembly method
|
Snap-fit — tool-free. No glue, no cutters required.
|
|
Articulation
|
22 points of super articulation
|
|
Materials
|
ABS, POM, PVC
|
|
Age recommendation
|
14 YEARS+
|
|
Estimated assembly time
|
30–60 minutes for first-time assemblers. Less with practice.
|
|
Difficulty
|
Beginner-friendly. No prior kit experience required.
|
|
Optional tools
|
Soft-bristle brush for dust after assembly. Dry cloth for display stand. Neither required for assembly itself.
|
What’s in the Box

The Naruto Champion Class 02 Naruto Uzumaki kit includes a fully verified list of contents from the official product page:
|
Included item
|
What it represents
|
How it’s used
|
|
103 assembled parts
|
Complete Naruto Uzumaki kit — body, costume, accessories.
|
Snapped together in sequence.
|
|
Rasenshuriken
|
Naruto’s advanced wind-nature technique.
|
Poseable display accessory.
|
|
Rasengan
|
Naruto’s core offensive technique.
|
Slots into open-palm hand part.
|
|
Kunai
|
Standard ninja weapon.
|
Poseable weapon accessory.
|
|
Special effect cloud parts
|
Chakra display accessories.
|
Extend visual footprint of posed stance.
|
|
Interchangeable face sculpts
|
Multiple expressions — combat and neutral.
|
Swap to change display mood.
|
|
Interchangeable hand sets
|
Grip types for different accessories.
|
Swap to match pose and accessory.
|
|
Display stand
|
Clear base stand for stable shelf display.
|
Included — no separate purchase needed.
|
Full contents listed on the official product page at blokees.com/en-us. Do not assume contents from this or any third-party description — verify against the official page before purchase.
Before You Start

Snap-fit assembly requires no tools, but a few setup habits make the result cleaner and more satisfying.
-
Workspace — flat, well-lit surface. A white or light-colored mat helps you spot dropped parts against the background. Small orange and blue parts disappear on dark surfaces.
-
Sort your parts first — lay out all the parts and identify each one before pressing anything together. The kit instructions show the assembly sequence.
-
Follow the sequence in the included instructions — the instructions show which parts connect in which order. Working out of sequence usually means disassembling and redoing a section.
-
Press firmly and evenly — snap-fit parts click when correctly seated. If a part feels like it’s forcing, stop. Check the orientation before pressing again.
-
Small parts storage — keep interchangeable face sculpts and hand sets in the original tray when not displayed. They’re small and easy to lose on a cluttered surface.
Step-by-Step Assembly

The Naruto Uzumaki kit assembles in four stages. Follow the sequence in the included instructions for a clean result.
Step 1 — Torso and Core Body
Start at the center of the kit. The torso is the primary assembly unit everything else connects to.
-
Front and back torso panels — align the two torso halves and press together until you hear the click. The neck joint socket should be visible and accessible at the top.
-
Pelvis / waist connector — attach below the torso. This joint provides the hip rotation that enables different leg positions.
-
Joint orientation — ball joints have a single correct orientation for their socket. If it feels wrong, rotate slightly before pressing.
Completed torso should stand on its own with the neck socket and hip socket both accessible. Don’t proceed to limbs until the torso clicks secure.
Step 2 — Arms and Legs
With the torso secured, attach the limb segments. Work one limb at a time to avoid confusion.
-
Shoulder joints — insert the upper arm ball into the shoulder socket. Full range requires the ball to seat completely.
-
Elbow and wrist joints — connect in sequence. Each segment has a directional orientation. The instruction diagram shows the correct angle.
-
Hip to knee to ankle — same sequential approach for legs. Ankle joints are critical for pose stability — a loose ankle will cause the kit to tip on the display stand.
Test each joint range before adding accessories. A joint that’s difficult to move was likely seated at the wrong angle.
Step 3 — Head and Face
The head attaches to the neck socket. Interchangeable faces slot into the front of the head unit.
-
Neck socket — seat the head ball firmly into the neck socket. The head should rotate and tilt without popping off during normal posing.
-
Face sculpt attachment — the face plate slides into guides on the front of the head. Press evenly from the top edge down. Don’t force from the sides.
-
Hair pieces — attach over the head unit. Naruto’s spiky hair sections have directional slots. Handle from the base of each spike, not the tip.
Swap between the included face sculpts by pressing the current one out from the back of the head unit. Replace by sliding the new sculpt in from the front.
Step 4 — Accessories and Display Stand
With the core kit assembled, attach the accessories and choose your display configuration.
-
Hand selection — choose the hand set that matches your intended pose. Rasengan grip for the Rasengan display. Open palm for Rasenshuriken. Weapon grip for Kunai.
-
Rasengan attachment — the Rasengan peg inserts into the open-palm hand. Seat the peg fully before posing the arm with the Rasengan loaded.
-
Rasenshuriken — larger effect accessory. Connects to a specific hand mount. Position the arm first, then attach the effect part.
-
Effect cloud parts — attach at the wrists or position around the feet depending on pose. These extend the visual footprint without adding mechanical complexity.
-
Display stand — insert the stand peg into the waist mount. Adjust the ankle joints to distribute the kit’s weight evenly before placing on the stand.
Pose Configurations

The 22-point articulation gives enough range for multiple distinct display setups. Here are the most stable options.
|
Pose
|
Configuration
|
Best display context
|
|
Rasengan stance
|
Right arm extended forward, open-palm hand, Rasengan loaded. Left arm back for counterbalance.
|
Rivalry pair with CC04 Sasuke Uchiha facing left.
|
|
Rasenshuriken pose
|
Both arms raised, Rasenshuriken effect part attached. Effect clouds at wrists. Slightly forward lean.
|
Solo centerpiece. High visual impact.
|
|
Standing neutral
|
Upright stance. Neutral face sculpt. Arms at rest with open hands. Display stand active.
|
Multi-kit team display. Doesn’t compete for attention in a four-kit setup.
|
|
Running stance
|
One leg forward, slight forward torso lean, arms in running position. Requires ankle adjustment for balance.
|
Single-kit desk setup with a lot of visual energy.
|
Common Mistakes to Avoid

|
Mistake
|
Why it happens
|
How to avoid
|
|
Forcing a joint that won’t click
|
Part inserted at wrong angle or orientation.
|
Stop. Remove the part. Check the instruction diagram for the correct orientation before re-inserting.
|
|
Attaching limbs before torso is secured
|
Working out of sequence.
|
Follow the instruction sequence. Complete each stage before moving to the next.
|
|
Rasengan drooping after attachment
|
Wrist joint not fully seated before loading the effect part.
|
Seat the hand firmly at the wrist before attaching the Rasengan. The Rasengan adds weight — a loose wrist won’t hold the angle.
|
|
Face sculpt cracking at edge
|
Pressing from the sides rather than the top.
|
Press face sculpts from the top edge down. Remove by pressing from the back of the head unit.
|
|
Hair spike breaking
|
Handling from the tip rather than the base.
|
Always hold hair pieces from the base. Never apply pressure to the spike tip.
|
|
Kit tipping on display stand
|
Ankle joints not adjusted before placing on stand.
|
Adjust ankles so the soles of the sandals sit flush on the stand surface. Test balance before finishing the pose.
|
Care After Assembly
ABS and PVC are durable but not immune to fading or joint wear. A few habits extend the display life significantly.
Protecting the display
-
Sunlight — UV exposure fades Naruto’s orange jumpsuit faster than most colors in the series. Keep the kit away from direct natural light.
-
Dusting — use a dry soft brush rather than a cloth. Cloths snag on joint edges and accessory protrusions. Once a week is enough for a desktop environment.
Maintaining joints
-
Repositioning — POM joints hold their tension better when repositioned occasionally. A kit locked in one pose for months can develop loose joints over time.
-
Interchangeable parts — face sculpts and hand sets are small. Keep them in the original tray when not in use. Losing them limits future display options.
-
Accessories — Rasenshuriken and Rasengan effect parts benefit from the same care. Store in the original tray when swapping to a different pose configuration.
What to Add Next
The Naruto Uzumaki kit is the natural starting point for a rivalry display. The direct next addition is Naruto Champion Class 04 Sasuke Uchiha — dark Uchiha color scheme, Chidori sword drawn, facing Naruto with Rasengan extended. Two kits. Same tier. The rivalry communicates itself.
After the rivalry pair, the Naruto Shippuden Legend Edition 01 Kurama (Nine Tails) at $49.99 is the natural rear-centerpiece addition. Nine tails spread wide behind the two-kit rivalry pair. Magnetic light-up feature activates forward. Full lineup at Blokees.
Full series character documentation at Naruto Official Website.
Conclusion
The Naruto Uzumaki kit is a snap-fit, tool-free assembly. No glue, no cutting tools. You snap the parts together, load the accessories, and pose him however you want. That’s the complete process.
103 parts, 22 articulation points, Rasenshuriken, Rasengan, Kunai, effect clouds, multiple faces, multiple hands, and a display stand in one box.
Follow the included instruction sequence. Press joints firmly to the click. Handle face sculpts and hair pieces from the base. Adjust the ankles before finalizing the pose on the stand.
FAQs
What’s the difficulty level for assembling this kit?
Beginner-friendly. The snap-fit method requires no prior kit experience. Parts press together by hand following the included visual instructions. No tools, no glue, no cutting required.
The most complex steps are the interchangeable face sculpt swap (learn to press from the back of the head, not the sides) and the Rasengan attachment (seat the wrist joint before loading the effect part). Both are manageable on a first attempt.
How long does it take to assemble?
30 to 60 minutes for a first-time assembler following the instructions carefully. Less once you’re familiar with the snap-fit joint system.
If you add accessory swaps or pose adjustments to the time estimate, add another 15 to 20 minutes. The interchangeable faces and hands are quick to swap once you know the correct pressure direction.
Do I need tools to assemble this kit?
No. The Naruto Champion Class 02 Naruto Uzumaki kit is confirmed snap-fit and tool-free on the official product page. Parts assemble by hand. No glue, no nippers, no hobby knives required.
An optional soft-bristle brush is useful for dusting the assembled kit over time but is not needed for assembly itself.
Can I swap the face sculpts and accessories?
Yes. Interchangeable face sculpts and hand sets are both included. Face sculpts swap by pressing from the back of the head unit to remove and sliding the new sculpt in from the front.
Hand sets swap at the wrist. Each hand type corresponds to a specific accessory hold. Choose the hand set before attaching an accessory rather than after.
Can I reassemble the kit if I change my mind on the pose?
Yes. Snap-fit joints are designed for repositioning. Every joint in the kit can be disassembled and reassembled without damage under normal handling.
The exception is repeatedly removing and re-inserting the same face sculpt more than a dozen times over months. The POM plastic that creates the snap tension can wear slightly over extended cycles. This is not an issue for normal display use.
How do I care for the assembled kit?
Keep it away from direct sunlight. Naruto’s orange and the warm tones in the design are the most UV-sensitive. Dust with a dry soft brush rather than a cloth, which catches on joint edges.
Reposition the joints occasionally rather than locking the kit in a single pose for months. This prevents gradual joint loosening from extended static tension.
Are there other Naruto Champion Class kits?
Yes. The Naruto Champion Class lineup includes Boruto Uzumaki, Sasuke Uchiha, Minato Namikaze (Reanimation), and Uchiha Madara, among others. All follow the same snap-fit standard. Full lineup at Naruto Champion Class.
The Naruto Shippuden Legend Edition series is the premium tier. The Kurama Nine Tails kit at $49.99 is the flagship product, with 263 parts, 31 articulation points, nine independent poseable tails, and a magnetic light-up feature.
Is this kit suitable for a display shelf?
Yes. It’s designed for display. The included stand provides stable support for standing poses. The articulation allows dynamic combat poses, running stances, and neutral display configurations.
For the best shelf result, choose your final pose before placing on the stand, then adjust the ankle joints to distribute weight evenly.
What makes the Naruto Uzumaki kit a strong first choice?
The Rasenshuriken and Rasengan accessory set is the most complete in the Champion Class lineup at the standard $19.99 tier. No other kit at this price point includes both techniques plus effect cloud parts in the same box.
The character is also the most immediately recognizable. If you’re uncertain which kit to start with, the protagonist is the safest choice. Every collector’s setup has room for Naruto Uzumaki.
Sources
- Naruto Champion Class 02 Naruto Uzumaki — Blokees — Official product page. Verified: 103 pieces, 22 pts, ABS/POM/PVC, snap-fit tool-free, $19.99, ages 14+, full accessory set.
- Naruto Champion Class Collection — Blokees — Official Champion Class series collection page.
- Naruto Toys Collection — Blokees — Official Naruto IP main collection.
- Naruto Champion Class 04 Sasuke Uchiha — Blokees — Official product page. Verified rivalry expansion kit.
- Naruto Fandom — Naruto Uzumaki — Character documentation. Ongoing updates.
- Wikipedia — Naruto Uzumaki — Series and character overview. Ongoing updates.
- Naruto Official Website — Official Naruto IP source. Ongoing updates.


Looking for something else?

Iron Man’s Armor Evolution: Mark 1 to Mark 85 with Blokees
LEARN MORE
Wolverine vs. Deadpool: Who Would Really Win?
LEARN MORE
The Complete History of the Venom Symbiote: Origins, Hosts, Films & Family Tree Explained
LEARN MORE
The Best Marvel Rivals Merchandise to Buy Right Now
LEARN MORELooking for something else?
Spider-Man vs. Venom: Best Desk Collectibles
LEARN MORE
Top 5 Iron Man Action Figures for Your Hall of Armor
LEARN MORE
Spider-Man’s Best Alternate Suits Explained
LEARN MOREYou may also like
New


Whole Set
New


Whole Set
New


Single Box
New


Whole Set
New


Mythical Aspect Sun Wukong
New


EVA-08α
Further reading

Harley Quinn's Complete Origin Story: From Doctor to Chaos Queen
Not many DC characters have traveled as far as Dr. Harleen Frances Quinzel. She started in 1992 as a one-episode sidekick in a cartoon. Three decades later, Harley Quinn is one of the best-known na...

Batman Beyond and Legendary Batman Assemble: A Guide to Two Officially Licensed Blokees DC Model Kits
The Blokees DC lineup includes two officially licensed Batman model kits that suit different collectors: the DC Champion Class 02 Batman Beyond and the DC Defender Version 01 Legendary Batman Assem...

Who Is Batman Beyond? The Dark Knight of the Future Explained
Gotham belongs to the bat. The man under the cowl never did, and Batman Beyond runs straight at that idea. Picture a neon future, decades past the Gotham most fans know, where Bruce Wayne has aged ...