Blokees® Community


Step-by-Step Guide: How to Assemble Blokees Optimus Prime
This guide walks you through assembling any Blokees Optimus Prime snap-fit kit from unboxing to final display. No glue, brush, or cutters required. Each of the ten phases includes a time estimate, skill level, and a clear checkpoint so you know when to move on. The full lineup is at Optimus Prime model kits. Kit recommendations are at the end.
Quick Start
|
What you need |
Kit + instruction booklet + flat surface + good light + patience |
|
What you don’t need |
Glue, cutters, paint, brushes, sandpaper, tweezers |
|
Assembly time |
30 minutes (CT01) to 3+ hours (Orion Pax) |
|
Difficulty range |
Beginner (ages 9+, CT01) to Advanced (ages 14+, Orion Pax) |
|
Rule #1 |
If a part will not click, check alignment. Never force. |
|
Rule #2 |
Install LED components BEFORE closing the chest plate. |
Part 1 — Prepare

Most assembly problems are prevented before the first part comes out of the runner frame. Spend 10 minutes on preparation and you save an hour of backtracking later.
Step 1 — Set up your workspace
TIME 5 minutes
Workspace matters more than first-time enthusiasts expect. Three things make the difference:
- Flat non-slip surface. A cutting mat or folded towel works well. Glass desks are the worst — parts slide.
- Direct overhead light. One LED desk lamp aimed at the center of your work area. You need to see alignment clearly.
- A tray for loose parts. A small bowl or lid keeps parts from rolling off the edge.
Tip: Assemble on a bed sheet if you can’t find a tray. Dropped parts land softly and you can see them immediately.
Step 2 — Know your kit
TIME 2 minutes
Five Optimus Prime kits are available. Each has different complexity and needs slightly different attention during assembly.
|
Kit |
Price |
Pieces |
Joints |
Age |
Assembly time |
|
Action Edition G1 Optimus Prime |
$39.99 |
188 |
45 |
14+ |
2–3 hours |
|
Action Edition Orion Pax |
$39.99 |
272 |
72 |
14+ |
3+ hours |
|
DX Classic Class Jet Wing |
$27.99 |
163 |
20 |
14+ |
1–2 hours |
|
Classic Class One Optimus Prime |
$19.99 |
— |
Full |
12+ |
45–60 min |
|
Blokees Wheels CT01 |
$12.99 |
78 |
— |
9+ |
Under 30 min |
Step 3 — Inventory the contents
TIME 3 minutes
Open the box. Lay every runner frame and accessory bag out flat. Compare against the parts list on page 1 of the manual. Two minutes of assembly prevents mid-process surprises.
Watch out. If a part is missing or damaged, note it before starting. Contact Blokees support with your order details.
Step 4 — Read the manual once through
TIME 3–5 minutes
Read every page before touching a part. You don’t need to memorize anything — just understand the overall sequence. Blokees kits use joint-locking sequences where some parts must go in before others to create clearance. Skipping ahead forces you to disassemble later.
Done when: You know roughly which body section comes first, which comes last, and where any LED or magnetic light components install.
Part 2 — Learn the Snap-Fit Technique

Every connection in every Blokees kit uses the same technique. Learn it once and you have it for every kit you will ever assemble.
How a snap-fit connection works
A small protrusion on one part slides into a recess on the other part. When fully seated, a tab or ridge locks the connection. The geometry of the connection point determines the approach angle — which is why the instruction diagram shows the approach direction for each piece.
The three-step method
- Align. Position the two parts so the connection points face each other at the angle shown in the manual. This is the most important step. If alignment is off, nothing else works.
- Seat. Bring the parts together gently until you feel resistance. The connection point has entered the recess. Do not press yet.
- Press. Apply even, steady pressure down the centerline of the connection. You will hear or feel a click. Done.
- How much pressure is right?
This is the part most first-time enthusiasts get wrong. Here is a guide:
|
Pressure level |
What it feels like |
|
Too soft |
You can press with one finger without noticeable effort. Connection will not click. |
|
Correct |
Firm thumb pressure. You feel resistance, then a sudden drop as the click lands. Two fingers max. |
|
Too hard |
You are bracing with both hands, leaning in, or feeling the part bend. Stop immediately. |
Watch out. If you are pressing hard and the part is not clicking, something is misaligned. The fix is always to remove the part and re-check the diagram — never to press harder.
How to know the connection is complete
- You hear a click. A firm crisp sound. The most reliable signal.
- You feel the seat. A clear physical sensation of the part seating into place.
- Surfaces are flush. No visible gap between the two parts.
- Part holds position. You can move the assembly and the part stays where you put it.
Part 3 — The Ten Assembly Phases

These phases apply to all Blokees Optimus Prime kits. Some phases have kit-specific notes. Follow them in order — do not skip ahead.
Phase 1 — Sort by body section
TIME 5–10 min • SKILL Beginner • APPLIES TO All kits
Group the runner frames by body section before connecting anything. This makes every later phase faster.
- Head and helmet
- Torso and chest plate
- Arms, shoulders, hands
- Legs, hips, knees, feet
- Accessories and weapons
- Light components and batteries (kept separate)
Tip: For the 272-piece Orion Pax, sorting takes closer to 10 minutes but saves 30+ during assembly.
Done when: All runner frames are in labeled groups and accessory bags are open.
Phase 2 — Assemble the lower body
TIME 15–40 min • SKILL Beginner to Intermediate • APPLIES TO All robot-mode kits
Start from the feet and work up. The legs support everything above them — a rushed lower body means a kit that leans.
What you’re assembling: two complete legs, attached at the hip joint.
- Assemble the left leg completely. Feet → ankle → lower leg → knee joint → upper leg.
- Assemble the right leg completely. Same sequence, mirrored parts.
- Assemble the hip joint.
- Attach both legs to the hip joint.
Orion Pax note: the 72 articulation points include multi-joint foot designs and leg linkage. Each sub-step counts — follow the manual carefully.
Done when: The kit stands unassisted on its feet without leaning, before the torso is attached.
Phase 3 — Install the light module (LED kits only)
TIME 5–10 min • SKILL Intermediate • APPLIES TO AE G1, AE Orion Pax, DX Jet Wing, Classic Class One
This is the critical LED phase. Once the chest plate closes in Phase 4, you cannot install or adjust the light module without disassembly.
|
Kit |
What you install |
|
Action Edition G1 Optimus Prime |
Magnetic light module for eyes + Matrix of Leadership. Verify magnet contact is clean. |
|
Action Edition Orion Pax |
Magnetic module for eyes, ears, and Matrix. Install Matrix of Leadership carefully — centerpiece feature. |
|
DX Classic Class Jet Wing |
LED components for eyes and chest. Batteries are included — check contact orientation. |
|
Classic Class One Optimus Prime |
Light-up module per the included instructions. |
|
Blokees Wheels CT01 |
No LED — skip this phase. |
Watch out. For magnetic kits (G1 and Orion Pax), test the activation by bringing the magnet near the chest BEFORE closing. If the lights do not activate, reseat the module and check the magnet.
Done when: The light module is installed, tested (for LED kits with batteries), and correctly seated in its cavity.
Phase 4 — Close the torso and chest

TIME 15–30 min • SKILL Intermediate • APPLIES TO All robot-mode kits
What you’re assembling: the structural core of the kit.
- Assemble the internal back panel and frame.
- Close the chest plate over the installed light module.
- Verify the plate sits flush with no gap.
- Connect the completed torso to the hip joint from Phase 2.
Tip: If the chest plate will not seat flush, open it and check that all internal frame pieces are in position. Something is usually slightly out of place — not damaged.
Done when: The torso sits square on the hip joint. No visible gap at any chest plate edge.
Phase 5 — Assemble the arms

TIME 20–45 min • SKILL Intermediate • APPLIES TO All robot-mode kits
Arm joints are tight by design — this is what gives the finished kit the ability to hold dynamic poses. Steady pressure is essential.
- Attach shoulder armor to the torso shoulder ports.
- Assemble the upper arm, connect to the shoulder joint.
- Assemble the elbow joint.
- Connect the forearm. Check that it rotates freely.
- Attach the wrist and hand. Orient the grip port for weapon attachment later.
- Repeat for the second arm.
Orion Pax note: the double-segment forearm extension bends over 60° before stretching, over 130° after. Test this range before moving on.
Watch out. Don’t attach shoulder accessories yet — they block arm joint articulation. Accessories go on in Phase 8.
Done when: Both arms have full articulation range and both hands grip securely.
Phase 6 — Assemble the head

TIME 10–20 min • SKILL Intermediate • APPLIES TO All robot-mode kits
The head comes after the arms because helmet clearance depends on shoulder position. Assemble the inner frame first, then the face plate, then the helmet.
- Assemble the inner head frame.
- Attach the face plate.
- For LED kits: install the eye light components before the helmet closes. Route carefully through the face plate access.
- For Orion Pax: choose from 4 face sculpts and 3 eye directions — you can swap later, so pick your display preference now.
- Attach the helmet and crest pieces.
- Connect the head to the torso neck joint.
Done when: The head rotates freely at the neck, the helmet seats flush with no base gap, and the face aligns straight forward.
Phase 7 — Attach the Jet Wing armor

TIME 15–25 min • SKILL Intermediate • APPLIES TO DX Classic Class Jet Wing only
Skip to Phase 8 if you are not assembling the DX Jet Wing kit.
- Lay out all Jet Wing components on the workspace.
- Connect the wing mounts to the back of the torso at the attachment points.
- Attach the left wing panel. It should click into the mount without force.
- Attach the right wing panel.
- Secure any additional back armor pieces.
- Test wing articulation — both side movement and folding should operate smoothly.
Tip: After wings are attached, the kit is top-heavy. Park it on the display stand when not actively working on it.
Done when: Both wings articulate smoothly through their full range.
Phase 8 — Attach weapons and accessories

TIME 10–20 min • SKILL Beginner • APPLIES TO All kits
Kit-specific accessories:
- G1 Optimus Prime: jet pack, laser cannon, energon axe, communicator, interchangeable hands.
- Orion Pax: Blaster, Energon Axe, Energon Axe Rotation Accessory.
- DX Jet Wing: all 7 weapons (Jetwing Gun Pods, Flight Unit, Dual Energon Swords, Combat Shield, Energon Axe, Ion Blaster, Barrage Cannons) plus blast effects.
- Classic Class One: accessories per the booklet.
- CT01: silver smokestack, auto-launcher, trailer accessories.
Watch out. Each weapon is designed to fit in one orientation. If the handle feels wrong, rotate the grip port — don’t force it.
Done when: All weapons are attached, grips hold securely, and the display stand is ready.
Phase 9 — Final inspection and testing

TIME 10–15 min • SKILL Beginner • APPLIES TO All kits
Before the first display pose, run through the kit once to catch any loose connection while you remember how you assembled it.
- Flex every joint through its full range. Note any that stick or feel loose.
- Activate the light features. Magnetic kits should illuminate when the magnet is near. LED kits should light when batteries are installed.
- Confirm all weapons hold in the grip ports under their weight.
- For Orion Pax, test both Dual-Form armor configurations.
- For CT01, confirm the auto-launcher moves smoothly and trailer supports deploy.
Done when: Every joint, every light, every accessory works as designed. No loose connections.
Phase 10 — Pose and display

TIME 5–10 min • SKILL Beginner • APPLIES TO All kits
The kit is complete. Now decide how you want to display it.
|
Kit |
Pose that works best |
|
G1 Optimus Prime |
Slightly forward-weight stance. Shoulders back, chest prominent, one arm forward. The heroic leader pose. |
|
Orion Pax |
Wide stance with the lobster-back spinal lean. The 72 joints reward dynamic asymmetric posing. |
|
DX Jet Wing |
LED active, wings fully extended. Shot from a lower angle to emphasize wing silhouette. |
|
Classic Class One |
Standing pose with light-up feature on. Compact desk setups work best. |
|
Blokees Wheels CT01 |
Truck and trailer in extended configuration. Auto-launcher raised. Trailer support legs deployed. |
Part 4 — When Something Goes Wrong
Most problems during assembly have simple causes. Before you call it a damaged kit, check this table.
|
Problem |
Most likely cause |
Fix |
|
A joint will not click |
Misalignment |
Remove the part. Re-check the diagram for approach angle. Press only after alignment is correct. |
|
Part fits but feels loose |
Incomplete seating |
Re-seat the part with firm steady pressure until you get a complete click. |
|
LED won’t light up |
Module not seated or battery issue |
Open the chest or head. Re-seat the light module. Check battery orientation. |
|
Joint won’t hold a pose |
Connection incomplete or joints not broken in |
Flex the joint through full range several times. New joints improve with a few cycles. |
|
Chest plate won’t sit flush |
Internal frame piece out of position |
Open the chest. Check every internal frame piece is seated before closing. |
|
Face sculpt is stuck |
Wrong orientation or dust in port |
Check the diagram orientation. Clean port with a soft dry brush. No liquid. |
|
Wing panel at wrong angle |
Wing mount not fully seated |
Detach. Click the mount fully into the back port. Re-attach from the correct approach angle. |
|
Weapon won’t grip |
Hand grip port orientation wrong |
Rotate the grip port to the correct angle per the diagram before inserting. |
When to take a break: If you have tried the same connection three times and it still will not click, stop. Walk away for 10 minutes. Come back with fresh eyes — you will almost always see the alignment issue immediately.
Part 5 — After Assembly: Care and Display

Daily careDust with a soft dry brush monthly. Focus on joint crevices.
- Avoid direct sunlight. UV fades red and blue paint over time.
- Don’t stack objects against the kit. Pressure causes joint misalignment.
- Re-pose every few months. Rotate joint stress positions.
Display setup
Lighting. A directional desk lamp from above-left creates panel shadow contrast. For LED kits, reduce ambient room light so the integrated lights stand out.
Elevation. Eye-level display or slightly above reads stronger than desk-level. Use a small riser or acrylic stand.
Grouping. Kits from the same series (Action Edition line, Transformers One line) look cohesive together. Mix eras only if intentional.
Advanced: panel lining without paint
A fine-tip grey or black marker applied to recessed panel lines makes surface detail more visible at display distance. It’s reversible with isopropyl alcohol on a cotton swab — not a permanent commitment. Test on one panel first; red panel line contrast varies by shade.
Part 6 — Recommended Blokees Optimus Prime Kits
Five kits are currently available across the Optimus Prime lineup. Here is how they compare and who each one is for.
Quick comparison
|
Kit |
Price |
Pcs |
Jnts |
LED |
Age |
Who it’s for |
|
AE G1 Optimus Prime |
$39.99 |
188 |
45 |
Yes |
14+ |
G1 collectors, serious assemblers |
|
AE Orion Pax |
$39.99 |
272 |
72 |
Yes |
14+ |
Advanced assemblers, dual-form fans |
|
DX Jet Wing |
$27.99 |
163 |
20 |
Yes |
14+ |
Trilogy fans wanting LED + 7 weapons |
|
Classic Class One |
$19.99 |
— |
Full |
Yes |
12+ |
Value buyers, TF One fans |
|
Blokees Wheels CT01 |
$12.99 |
78 |
— |
No |
9+ |
First assembly, younger fans, gifting |
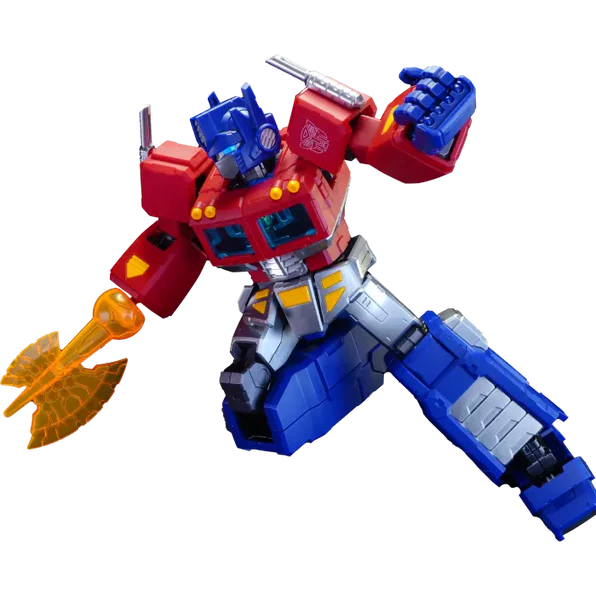
1. Action Edition G1 Optimus Prime — $39.99

188 pieces. 45 joints. 18cm standing height. Ages 14+. Magnetic light module activates glowing eyes and the removable Matrix of Leadership. Full details at Action Edition G1 Optimus Prime.
Pick this if: you want the definitive G1 animation-era Optimus Prime at the Action Edition tier.
2. Action Edition Optimus Prime | Orion Pax — $39.99

272 pieces. 72 articulation points — highest in the lineup. Ages 14+. Dual-Form System with two complete armor sets. 4.9 out of 5 stars from 10 verified reviews. Full details at Action Edition Orion Pax.
Pick this if: you want maximum articulation, dual display modes, and the highest-rated Optimus Prime kit.
3. DX Classic Class Jet Wing Optimus Prime — $27.99

163 pieces. 20 joints. 13.4cm standing height. Ages 14+. LED eyes and chest with batteries included. 7 weapons drawn from the trilogy films. Multi-articulated wings.
Pick this if: you want LED features, wing articulation, and the widest weapon variety at a mid-range price.
4. Classic Class One Optimus Prime — $19.99

5-inch height. Ages 12+. Light-up features included. Full articulation. Transformers One (2024) character design. Full details at Classic Class One Optimus Prime.
Pick this if: you want light-up features at the lowest price, or you’re a Transformers One fan.
5. Blokees Wheels CT01 Optimus Prime — $12.99

78 pieces. 1:64 scale. Ages 9+. ABS + SOLIDEX™ high-density material. Truck cab, trailer, and auto-launcher format. Best seller.
Pick this if: it’s your first assembly, you’re a younger fan, you’re buying a gift, or you collect vehicle-scale kits.
Which one should you start with?
- Never assembled a Blokees kit before: CT01 at $12.99. Under 30 minutes, ages 9+.
- First full-size poseable kit: Classic Class One at $19.99. Light-up at the lowest price.
- Intermediate challenge: DX Jet Wing at $27.99. 163 pieces, LED, 7 weapons.
- Experienced assembler: Action Edition G1 at $39.99. 188 pieces, 45 joints, 18cm.
- Maximum articulation: Orion Pax at $39.99. 72 joints, Dual-Form, 4.9★ rating.
Conclusion
Work through the ten phases in order, apply the align-seat-press technique, and check the troubleshooting table if a joint will not click. The full Optimus Prime lineup is at Blokees.
FAQs
How long does it take to assemble a Blokees Optimus Prime kit?
CT01 takes under 30 minutes. Classic Class One is 45 minutes to an hour. DX Jet Wing is 1–2 hours. Action Edition G1 is 2–3 hours. Orion Pax is 3+ hours.
Do I need tools?
No. All five kits use tool-free snap assembly. No glue, brush, cutters, or nippers required.
What if a part won’t snap into place?
Stop and check alignment. Refer to the instruction diagram for the approach direction. Never force a snap-fit connection — that breaks parts.
Can I disassemble after completion?
Yes. Snap-fit connections reverse with gentle outward pulling. Kits tolerate multiple assembly cycles.
What if I lose a small piece?
Contact Blokees support with your order details. Keep the runner frames until assembly is complete — loose parts often end up near the frames.
Which kit is best for beginners?
Blokees Wheels CT01 at $12.99 — 78 pieces, ages 9+, under 30 minutes. The Classic Class One at $19.99 is the next step after CT01.
Do LED and magnetic lights work right after assembly?
Yes. DX Jet Wing includes batteries. Action Edition kits use magnetic activation — the magnet module brings lights on when placed near the chest.
What’s the difference between G1 Optimus Prime and Transformers One Optimus Prime?
G1 is the 1984 animation design — classic red and blue color scheme. Transformers One is the Orion Pax era design from the 2024 film — a different character-era visual.
Sources
- Verified specs: Transformers Action Edition G1 Optimus Prime. 14+, ABS, 18cm, 188 pcs, 45 joints, $39.99.
- Verified specs: Transformers Action Edition Optimus Prime Orion Pax. 14+, 272 pcs, 72 joints, 4.9★, $39.99.
- Verified specs: Transformers DX Classic Class Jet Wing Optimus Prime. 14+, 13.4cm, 163 pcs, 20 joints, LED, 7 weapons, $27.99
- Verified specs: Transformers Classic Class One Optimus Prime. 12+, 5 in., light-up, $19.99.
- Blokees Wheels CT01 Optimus Prime. 9+, ABS + SOLIDEX™, 78 pcs, 1:64, $12.99.
- Character overview: Wikipedia — Optimus Prime, April 2026.
- G1 design reference: TFWiki — G1 Optimus Prime, April 2026.
- Collection: Optimus Prime model kits


Looking for something else?

Iron Man’s Armor Evolution: Mark 1 to Mark 85 with Blokees
LEARN MORE
Wolverine vs. Deadpool: Who Would Really Win?
LEARN MORE
The Complete History of the Venom Symbiote: Origins, Hosts, Films & Family Tree Explained
LEARN MORE
The Best Marvel Rivals Merchandise to Buy Right Now
LEARN MORELooking for something else?
Spider-Man vs. Venom: Best Desk Collectibles
LEARN MORE
Top 5 Iron Man Action Figures for Your Hall of Armor
LEARN MORE
Spider-Man’s Best Alternate Suits Explained
LEARN MOREYou may also like


Further reading

Harley Quinn's Complete Origin Story: From Doctor to Chaos Queen

Batman Beyond and Legendary Batman Assemble: A Guide to Two Officially Licensed Blokees DC Model Kits