Blokees® Community


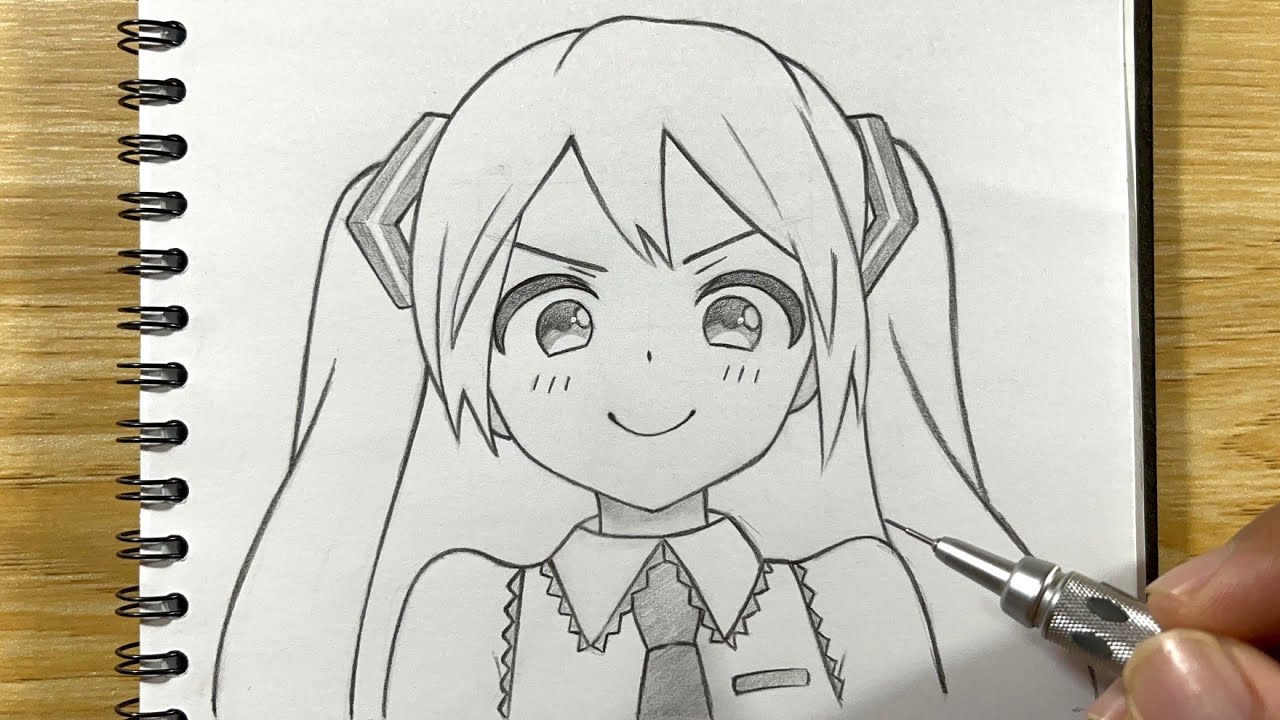
How to Draw Miku: Step-by-Step Guide for Beginners
Are you looking for a fun and creative way to connect with your fandom? Learning how to draw Miku is a great place to start. Whether you’re a beginner artist or a seasoned fan of Hatsune Miku, this guide will walk you through the process step-by-step. You’ll discover both basic and advanced techniques for drawing her signature twin-tails, outfit details, and expressive anime face.
Along the way, we’ll also highlight how you can gain inspiration from Miku collectibles—browse the full Hatsune Miku toys collection and consider premium pieces like the Fantastics Series Hatsune Miku Vivid Echoes or Fantastics Series Sakura Miku. By the end of this article, you’ll be ready to draw your own version of Miku and display it alongside your collectibles.
Supplies You’ll Need
Before you begin drawing, gather the right tools. Whether you prefer traditional or digital drawing, the right supplies make a big difference.
Traditional tools:
- A2 or A3 sketch paper (or even A4)
- HB pencil for sketching, 2B for shading
- Eraser (kneaded if possible)
- Fine-tip ink pen or liner for outlines
- Colouring tools: coloured pencils, markers, or water-colours
- Reference image of Miku (look at official portrayals or toys)
Digital tools (if drawing digitally):
- Tablet or graphics tablet with pen stylus
- A drawing program (Clip Studio, Procreate, Photoshop)
- Layers, brushes for line-work and colouring
- Reference gallery for Miku poses and her outfit
Sketching the Basic Proportions

Creating a successful drawing of Miku starts with correct proportions and structure.
Step-by-step:
- Head and Face: Draw an oval for the head. Add a horizontal line slightly below the centre for the eyes, and a vertical line for symmetry.
- Body Framework: Sketch a narrow torso beneath the head, then the hips and legs using simple shapes (cylinders or blocks).
- Limbs and Pose: Choose a pose (standing, singing, poseable). Sketch arms and legs with basic lines and joint-marks.
- Twin-tails Structure: Draw two curved lines from the top of the head downwards—these will become her iconic long twin-tails. Don’t add full detail yet; block them out roughly.
- Balance and Gesture: Make sure her pose looks natural. For example, tilt the hips slightly if one leg is bent, raise an arm if she’s performing.
Tip from the community:
“Sketch the body’s anatomy… Use light-pencil guidelines.”
With these guidelines in place, you’ve formed a skeleton for your drawing.
Drawing the Face and Hair

Face:
- Eyes: Draw big, expressive anime-style eyes. Place them along the horizontal guideline. The iris should take up much of the eye.
- Nose and Mouth: Keep them simple. Usually small nose line and a subtle smile for Miku.
- Hairline and Bangs: Miku’s bangs are important. They frame her face and often fall in a “W” shape.
- Expression: Think about emotion—singing, smiling, playful. Adjust eyebrows and mouth accordingly.
Hair:
- Twin-tails: Miku’s long twin-tails are her signature. Define the large mass of hair first. Then add flowing strands and highlights.
- Hair accessories: Include the rectangular hair-bands near the base of each tail.
- Flow: Hair should follow gravity but also have movement. Use S-curves to show this.
- Highlights and shading: Use a lighter colour or white streak for shine on hair. Community tips mention: “white highlights… hair planes…”
Example tutorial steps:
Begin by sketching the face… then draw long, curved lines extending for the pigtails.
Drawing the Outfit and Details

Key Outfit Elements:
- Collar and Tie: Miku often wears a sailor-style collar and neck-tie. Draw two triangular collar flaps, then a knot and tie below.
- Sleeves and Arm Panels: Her sleeves are long with digital-style panels. Use straight lines and small rectangles for details.
- Skirt: A pleated mini-skirt. Sketch the waistline, then add pleats by alternating light and dark shading.
- Stockings and Boots: She wears thigh-high stockings and boots. The boots have a futuristic design.
- Accessories and Logos: Small details like the “01” armband on her left arm, printed circuit-style patterns, and headphone-like devices.
Adding Details:
- Use reference images of Miku or even Hatsune Miku toys for accurate detailing.
- Work from large shapes to smaller details—first block shapes (collar, skirt), then add lines for pleats and panels.
- For shading, decide on a light source (e.g., top-right). Shade the opposite side for depth.
Inking, Colouring & Final Touches
To bring your drawing from sketch to polished artwork, follow these final steps.
Inking:
- Use a fine-tip pen or liner to trace the final lines.
- Erase pencil guidelines after ink dries.
- Vary line thickness: thicker for outer lines, thinner for inner details.
Colouring:
- Start with flat base colours: teal hair, grey/black outfit, aqua accents.
- Add shading: Use darker tones on underside of hair, folds in clothing, etc.
- Highlights: Use white or very light colour to mark hair shine, eyes sparkle.
- Digital alternative: Use layers for line art, base colour, shading, and highlights.
Background & Pose Enhancements:
- Optional: Add a stage background, musical notes, spotlight arcs.
- Pose can reflect Miku singing or holding a microphone to capture her virtual-idol vibe.
Connect to Collectibles:
If you own such as Fantastics Series Hatsune Miku Vivid Echoes or Fantastics Series Sakura Miku, use photos or models as live reference. Doing so enhances your drawing’s accuracy and gives you inspiration for display.
- Once done, consider framing your drawing next to a Miku.
- On social media, tag your work with #howtodrawMiku or #HatsuneMikuArt to share with the community.
Variations & Style Adjustments
Once you’ve mastered a standard Miku pose, you can explore variations.
Chibi Style:
Simplify proportions – larger head, smaller body. Emphasize Miku’s twin-tails and her big eyes.
Tutorials like those on YouTube target how to draw Miku easy in a chibi format.
This style is perfect for beginners or fans who want a cute version.
Dynamic Poses & Concert Themes:
- Miku often appears in performing poses: microphone in hand, one leg forward, twintails in motion.
- Use photos of live shows, or reference for stage poses.
- Play with motion lines, flowing hair, flying ribbons to show movement.
Season & Outfit Variants:
- Sakura Miku (cherry-blossom themed) features pink hair and floral details.
- Use toy references like the Fantastics Series Sakura Miku to guide these variants.
- Seasonal colour palettes give you flexibility and keep your art fresh.
Fan Art & Style Fusion:
- Blend Miku with different art styles: cyberpunk, casual wear, winter outfit.
- Use fan-forums and tutorials for inspiration. As a Reddit user indicated:
“Looking at many references is the best thing you can do.”
This creative freedom helps your “how to draw Miku” practice stay engaging.
Use Your Drawing for Fandom & Collectibles

Drawing Miku isn’t just a hobby—it’s a way to integrate with the broader fandom and collectible culture.
Display & Decor:
- Place your finished drawing alongside a from the Hatsune Miku toys.
- Create a mini-display shelf with your art as a backdrop.
Gifts & Community Shares:
- Gift your drawing to a fellow fan or upload it on social media.
- Use hashtags like #howtoDrawHatsuneMiku, #MikuFanArt to expand engagement.
Inspiring Collectible Displays:
- Having drawn Miku, you’re more attuned to the design details of like Fantastics Series Hatsune Miku Official Outfit.
- You’ll notice small design elements that artists use, and you can replicate or reinterpret them in your art.
Personal Growth & Skill Cultivation:
- Each drawing improves your skills: line work, anatomy, shading, colour.
- Keep a sketchbook and compare your older drawings to new ones to measure progress.
- Celebrate your improvements by sharing your “first Miku drawing” vs your current one.
Conclusion
Drawing Hatsune Miku is an accessible and rewarding project for fans and artists alike. Starting from basic supplies, through proportions, face and hair, to outfit details and final touches, you now have a full roadmap for how to draw Miku.
Whether you choose a classic look, a chibi version, a seasonal variant, or a dynamic concert pose, your art can link closely to the vibrant fandom and collectible world—like the Hatsune Miku toys. Remember: practice regularly, reference real or photos, and enjoy the process. Your next Miku drawing might even become part of your display.
Frequently Asked Questions
How to draw Miku easy for beginners?
Start with simple shapes—circle for head, lines for body, twin-tail flows. Follow tutorials like those on EasyDrawingGuides.
What pose should I pick first?
A standing pose with arms slightly out and twin-tails falling straight is easiest. Save dynamic poses for later.
Should I draw from a or photo reference?
Yes—using a, such as from the Hatsune Miku toys collection, helps you capture correct design details and proportions.
How do I add colour and shading effectively?
Decide on a light source, apply flat base colours first, then add darker shades and white highlights (especially on hair).
Where can I share my Miku drawing?
Use platforms like Instagram, Reddit (#MikuFanArt), art communities. Join tags like #howtodrawMiku for feedback and exposure.
Looking for something else?
How to Clean and Maintain Your Transformers Model Kits
LEARN MORE
Transformers Wave 4 Checklist: Collect Them All
LEARN MORE
Marvel Rivals Roster: Every Confirmed Character So Far with Blokees
LEARN MORE
Iron Man’s Armor Evolution: Mark 1 to Mark 85 with Blokees
LEARN MORELooking for something else?

Wolverine vs. Deadpool: Who Would Really Win?
LEARN MORE
The Complete History of the Venom Symbiote: Origins, Hosts, Films & Family Tree Explained
LEARN MORE
The Best Marvel Rivals Merchandise to Buy Right Now
LEARN MOREYou may also like


Further reading
Adding Panel Lining to Your Naruto Kits for Anime Accuracy

Official Blokees Naruto Character Collection Guide
Assembling Sasuke’s Chidori Effects Parts